Thursday, October 31, 2013

Thursday, October 24, 2013
Pumpkin and Halloween Decorating
Decorating the house for the holidays is always fun! A lot of decorations can be a bit cheesy though so I wanted to create a look that wasn’t too cheesy or creepy. I really don’t like carving pumpkins so after a bit of inspiration {previous post} I decided to paint my pumpkins with gold polka dots. It was super simple, I washed the pumpkin, then had to remove some of the stem as I picked them from the pumpkin patch and then used a gold sharpie paint pen to paint polka dots of various sizes directly on the pumpkin. Note to others, do not ask your boyfriend/husband/significant other to help remove any extra large stems as they may decide to use an angle grinder and chop nearly the whole thing off (luckily not my fingers!)


In the above photo, I used a picture of some pumpkins I took a few years back and did some photoshop editing to create the look I wanted, printed out and framed. Then in the white frame I printed out a Halloween subway art printable I found last year. Sorry, I’m not sure the source right now, but there are lots available via pinterest.
In case you missed my previous post, check out the adorable burlap stenciled Halloween sign I made. Happy decorating!
Saturday, October 19, 2013
Color Series: Orange
This color series I am featuring orange as it is halloween (AKA orange) month! Some of you may be over the pantone color of the year 2012 tangerine tango or orange as the plain folk call it. But I am not! I absolutely love the bright color and think it can be used as a main or accent color in many spaces. Check out these spaces that use orange and let me know if you love it or hate it. In case you missed the first of the color series check out Gold Love here.

The Hills are Livin

The Zhush

Better Homes and Gardens

Belle Maison

Mix and Chic

Comfy Cozy Couture

Live.Like.You
Sunday, October 13, 2013
Burlap Flag Halloween Sign

Update: I just came across this amazing tutorial on making a reversible banner so you can use it for two holidays! Score! The next banner I make will definitely be done this way since it is so practical.
Burlap is cheap, only if you buy it by the yard and not in pre-cut pieces. The craft stores are smart and have seen the burlap trend catch on so they sell smaller pieces ready to go with a hefty upcharge. When I went to Joann’s the burlap I choose was under $4 a yard and I had a 40% off coupon I used. I purchased 2 years with an intent to use it for some other projects.
What you need:
1 yard of burlap
a small paintbrush
acrylic paint
twine, rope, ribbon, cord, etc.
Letter stencils of a size that works with the size of flag you are making
scissors
a piece of paper, pen and ruler ( or a computer and printer)
paper bags or something to cover your work surface
First, draw or make on the computer a flag shape on an 8 1/2 x 11” sheet of paper to create a template. You can do whatever size you like but this is what I did mine on. My printer is not currently working so I just measured the mid point of the 8 1/2” size and used a ruler to draw up to the opposing corners and cut, pretty easy. Use this template piece to cut out your flags on the burlap. I am a perfectionist by nature but I have learned to let it go on a lot of things. This is one, the flags will not all be perfect in size and have straight cuts. Its really note a big deal to have these little flaws especially on burlap.
Next, cover your work surface with paper bags or something so you don’t get paint all over. Decide on the location you want your letters to go and keep this consistent across every flag. I used a magazine (couldn’t find a ruler during this step) to create a line from the bottom of the letter to the next flag to determine placement. Holding your stencil over the burlap, apply the paint in a tapping or stippling motion, being careful to hold the edges tight. I was a little worried while I was doing this as I couldn’t see the clear stencils very well and I didn’t tape the stencils down so edges would lift up. Mine still turned out pretty perfect (shocking for me!). Now lay them out to dry. Feel free to play with the amount of paint you use. Doing lighter and darker spots would create more of a printed or stamped look. Or try doing it light all over to give a more aged look. I would suggest washing each stencil right away so you remove any signs of paint. I waited until I had done four and it was a pain to remove it, at least on the type of stencils I had. I would also suggest purchasing stencils that are any color other than clear. The clear against the burlap was very hard to see when you were trying to apply the paint.


Once the paint is dry you can gather up your flags and whatever material you are using to string the sign. I used a twine I found in the beads section at Michaels, that they referred to as cord. I didn’t have a big enough needle to thread the twine through so I just poked the needle through the burlap to create a wider hole to put the twine through. As you are doing this, make sure you are consistent in the placement of the holes on each flag.Thread the entire flag. My twine began unwinding so I dipped it in a bit of melted wax from a candle to make my own needle out of it and it worked so much better. When you are done, find a fabulous place to hang your new sign!


Think of all the things you can make these signs for:
- baby announcement/showers/births
- nurseries and Children's rooms
- everyday home décor
- other holidays
- weddings, showers and bachelorette parties
- parties or events
- lemonade stands
- Your child's play areas (theater, grocery store, restaurant, whatever else)
What have you been making with burlap lately? I would love to hear some other ideas!
Thursday, October 10, 2013
Decorating Pumpkins
I don’t know about you but I do not enjoy carving pumpkins. I mean who really wants to deal with that cold, gooey mess? Not me. I found some inspiration for decorating my pumpkins this year without having to carve them!
Studded pumpkins
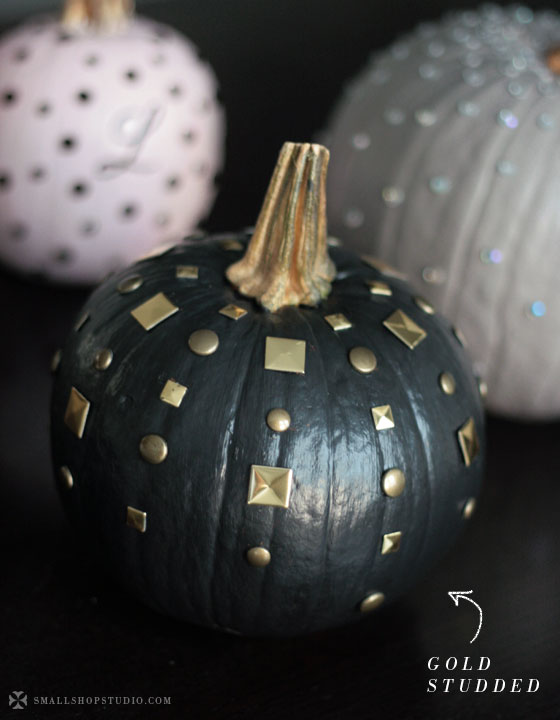
Small Shop Studio

PaperLili
Washi Tape Pumpkins

I Heart Nap Time

Babble
Chevron pumpkins
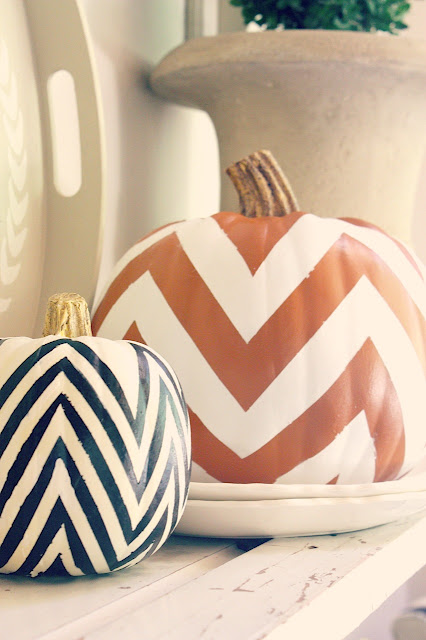
My Sweet Savannah
Spots and Dots

Brown Eyed Girly Girl

Think Crafts
Monogram pumpkin
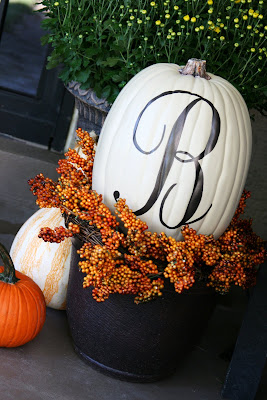
The Butlers
Glitter Pumpkins-this is actually epsom salt!

Davis Day By Day
Now I will have to figure out how I am going to decorate my pumpkins without carving them!
Sunday, October 6, 2013
Falling into Fall
I looked out my window today and realized wow all the leaves are begging to change, almost overnight! Although I hate the cold, rainy weather fall and winter brings us, I love seeing the beautiful array of colors spread throughout the trees. Last year I was in awe of the beauty and wanted to take lots of photos, but the window of opportunity is quick. I snapped these photos outside a shopping center if you can believe that! This year, I must find some beautiful places to photograph the changing leaves.


If anyone has any suggestions on places around the Portland area to photograph fall time I would love to hear them!
Subscribe to:
Posts (Atom)